Swagger UI is great for interactive API docs, but sometimes you need a professional PDF document.
This can be for legal contract reasons
(which happened to me :) - which is why i did this in first place )
Or maybe you are delivering a product with an API, and you want to deliver a PDF of the API as a techincal artifact for the end customer.
Whatever the reason, let’s take a swagger.json file and turn it into a LaTeX-generated PDF using Python. 🚀
🔧 Step 1: Install Dependencies
We’ll use the following Python libraries:
json – To parse the swagger.jsonjinja2 – To generate LaTeX templates dynamicallysubprocess – To compile LaTeX into a PDF
Install Required Packages:
1
2
| pip install jinja2
sudo apt install texlive texlive-latex-extra pdflatex
|
(For Windows, install MiKTeX or TeX Live manually.)
📜 Step 2: Create the LaTeX Template
First, create a LaTeX template (swagger_template.tex) that will be dynamically filled using Jinja2.
 1
 2
 3
 4
 5
 6
 7
 8
 9
10
11
12
13
14
15
16
17
18
19
20
21
22
23
24
25
26
27
28
29
30
31
32
33
34
35
36
37
38
39
40
41
42
43
44
45
46
47
48
49
50
51
52
53
| \documentclass{article}
\usepackage{longtable}
\usepackage{hyperref}
\usepackage{geometry}
\geometry{a4paper, margin=1in}
\title{API Documentation}
\author{Generated from OpenAPI}
\date{\today}
\begin{document}
\maketitle
\section*{API Overview}
This document provides a detailed reference for the API endpoints.
\section*{Endpoints}
{% for path, methods in paths.items() %}
\subsection*{{Path: \texttt{{path}}}}
{% for method, details in methods.items() %}
\textbf{Method:} \texttt{{ method.upper() }} \\
\textbf{Summary:} {{ details.summary | default("No summary provided") }} \\
\textbf{Description:} {{ details.description | default("No description provided") }} \\
\textbf{Parameters:}
\begin{longtable}{|p{3cm}|p{3cm}|p{8cm}|}
\hline
\textbf{Name} & \textbf{Type} & \textbf{Description} \\
\hline
{% for param in details.parameters %}
{{ param.name }} & {{ param.schema.type | default("Unknown") }} & {{ param.description | default("No description") }} \\
\hline
{% endfor %}
\end{longtable}
\textbf{Responses:}
\begin{longtable}{|p{2cm}|p{3cm}|p{9cm}|}
\hline
\textbf{Code} & \textbf{Type} & \textbf{Description} \\
\hline
{% for code, response in details.responses.items() %}
{{ code }} & {{ response.content["application/json"].schema.type | default("Unknown") }} & {{ response.description | default("No description") }} \\
\hline
{% endfor %}
\end{longtable}
{% endfor %}
{% endfor %}
\end{document}
|
📝 Step 3: Write a Python Script to Convert swagger.json to LaTeX
Now, create a Python script (swagger_to_latex.py) to read the Swagger JSON file, render it into the LaTeX template, and compile it into a PDF.
 1
 2
 3
 4
 5
 6
 7
 8
 9
10
11
12
13
14
15
16
17
18
19
20
21
22
23
24
25
26
27
28
29
30
31
32
33
34
35
36
37
| import json
import os
import subprocess
from jinja2 import Template
# File paths
SWAGGER_JSON_FILE = "swagger.json"
LATEX_TEMPLATE_FILE = "swagger_template.tex"
GENERATED_LATEX_FILE = "api_documentation.tex"
OUTPUT_PDF = "api_documentation.pdf"
# Load Swagger JSON
with open(SWAGGER_JSON_FILE, "r") as f:
swagger_data = json.load(f)
# Load LaTeX template
with open(LATEX_TEMPLATE_FILE, "r") as f:
template_content = f.read()
# Create Jinja2 template
template = Template(template_content)
# Render LaTeX file with OpenAPI data
rendered_latex = template.render(paths=swagger_data.get("paths", {}))
# Write LaTeX content to file
with open(GENERATED_LATEX_FILE, "w") as f:
f.write(rendered_latex)
print(f"✅ LaTeX file '{GENERATED_LATEX_FILE}' generated successfully.")
# Compile LaTeX to PDF
try:
subprocess.run(["pdflatex", GENERATED_LATEX_FILE], check=True)
print(f"✅ PDF '{OUTPUT_PDF}' generated successfully.")
except subprocess.CalledProcessError:
print("❌ Error compiling LaTeX to PDF.")
|
🏗 Step 4: Run the Script
1️⃣ Place your swagger.json in the same directory as the script.
2️⃣ Run the script:
1
| python swagger_to_latex.py
|
3️⃣ If successful, your API documentation PDF will be generated as api_documentation.pdf.
🏗 Latex Output
  1
  2
  3
  4
  5
  6
  7
  8
  9
 10
 11
 12
 13
 14
 15
 16
 17
 18
 19
 20
 21
 22
 23
 24
 25
 26
 27
 28
 29
 30
 31
 32
 33
 34
 35
 36
 37
 38
 39
 40
 41
 42
 43
 44
 45
 46
 47
 48
 49
 50
 51
 52
 53
 54
 55
 56
 57
 58
 59
 60
 61
 62
 63
 64
 65
 66
 67
 68
 69
 70
 71
 72
 73
 74
 75
 76
 77
 78
 79
 80
 81
 82
 83
 84
 85
 86
 87
 88
 89
 90
 91
 92
 93
 94
 95
 96
 97
 98
 99
100
101
102
103
104
105
106
107
108
109
| \documentclass{report}
\usepackage{longtable}
\usepackage{hyperref}
\usepackage{geometry}
\usepackage{fancyhdr}
\geometry{a4paper, margin=1in}
\setcounter{secnumdepth}{0}
\pagestyle{fancy}
\fancyhf{}
\rhead{API Documentation}
\lhead{Generated from OpenAPI}
\rfoot{\thepage}
\title{API Documentation}
\author{Generated from OpenAPI Specification}
\date{\today}
\begin{document}
\maketitle
\tableofcontents
\chapter{Introduction}
This document provides a comprehensive reference for the API, including available endpoints, request parameters, response structures, and authentication methods.
\chapter{Endpoints}
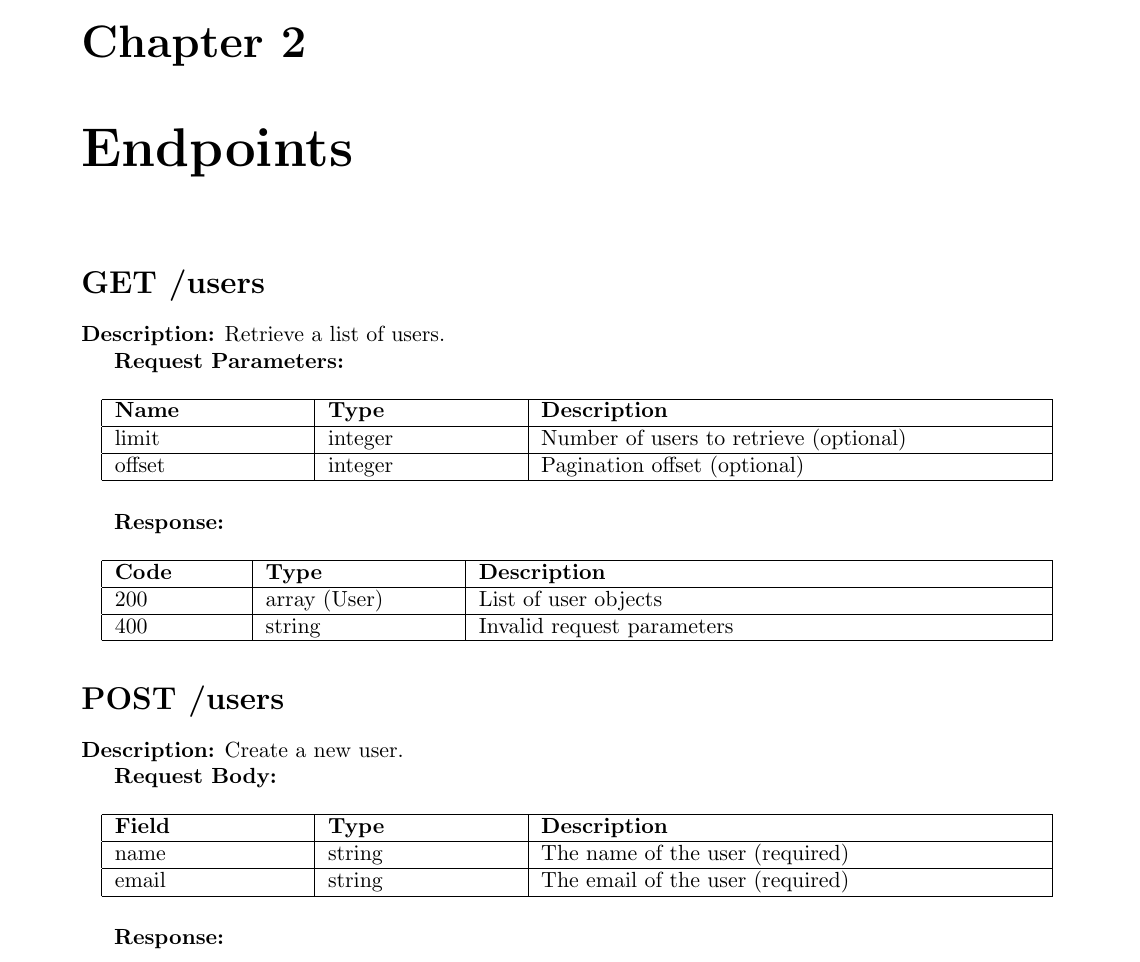
\section{GET /users}
\textbf{Description:} Retrieve a list of users.
\textbf{Request Parameters:}
\begin{longtable}{|p{3cm}|p{3cm}|p{8cm}|}
\hline
\textbf{Name} & \textbf{Type} & \textbf{Description} \\
\hline
limit & integer & Number of users to retrieve (optional) \\
\hline
offset & integer & Pagination offset (optional) \\
\hline
\end{longtable}
\textbf{Response:}
\begin{longtable}{|p{2cm}|p{3cm}|p{9cm}|}
\hline
\textbf{Code} & \textbf{Type} & \textbf{Description} \\
\hline
200 & array (User) & List of user objects \\
\hline
400 & string & Invalid request parameters \\
\hline
\end{longtable}
\section{POST /users}
\textbf{Description:} Create a new user.
\textbf{Request Body:}
\begin{longtable}{|p{3cm}|p{3cm}|p{8cm}|}
\hline
\textbf{Field} & \textbf{Type} & \textbf{Description} \\
\hline
name & string & The name of the user (required) \\
\hline
email & string & The email of the user (required) \\
\hline
\end{longtable}
\textbf{Response:}
\begin{longtable}{|p{2cm}|p{3cm}|p{9cm}|}
\hline
\textbf{Code} & \textbf{Type} & \textbf{Description} \\
\hline
201 & object (User) & The created user object \\
\hline
400 & string & Invalid request body \\
\hline
\end{longtable}
\section{GET /users/{id}}
\textbf{Description:} Retrieve a user by ID.
\textbf{Path Parameters:}
\begin{longtable}{|p{3cm}|p{3cm}|p{8cm}|}
\hline
\textbf{Name} & \textbf{Type} & \textbf{Description} \\
\hline
id & integer & The unique ID of the user (required) \\
\hline
\end{longtable}
\textbf{Response:}
\begin{longtable}{|p{2cm}|p{3cm}|p{9cm}|}
\hline
\textbf{Code} & \textbf{Type} & \textbf{Description} \\
\hline
200 & object (User) & The user object \\
\hline
404 & string & User not found \\
\hline
\end{longtable}
\chapter{Authentication}
All API requests require authentication using a Bearer token in the HTTP Authorization header.
\begin{verbatim}
Authorization: Bearer <your-token-here>
\end{verbatim}
\end{document}
|
Pdf Output
and here is what the Latex Looks like when converted into PDF
How to Create a PDF from LaTeX (Using pdflatex)
Once you have your LaTeX document (api_documentation.tex), follow these steps to generate a PDF.
🚀 Method 1: Using pdflatex (Recommended)
If you have TeX Live (Linux/macOS) or MiKTeX (Windows) installed, you can compile the .tex file into a PDF using the pdflatex command.
1️⃣ Install LaTeX Compiler
- Linux (Ubuntu/Debian)
1
| sudo apt install texlive texlive-latex-extra
|
- macOS
- Windows
2️⃣ Run pdflatex
Navigate to the directory where your .tex file is located and compile it:
1
| pdflatex api_documentation.tex
|
If your document uses tables or references, run pdflatex twice to ensure everything compiles correctly.
1
2
| pdflatex api_documentation.tex
pdflatex api_documentation.tex
|
3️⃣ Check the Output
After running pdflatex, you should see a new file:
Open it in any PDF viewer to check the formatting.
📜 Method 2: Using Overleaf (Online)
If you don’t want to install anything, use Overleaf—a free online LaTeX editor.
Steps
- Create a new Overleaf project.
- Upload your
api_documentation.tex file. - Click Compile to generate the PDF.
- Click Download PDF.
🖥️ Method 3: Using a GUI LaTeX Editor
If you prefer a graphical interface, install TeXworks (comes with MiKTeX) or TeXmaker.
- Open
api_documentation.tex in the editor. - Click Compile (Make sure pdflatex is selected).
- Save and download the PDF.
🔥 Bonus: Automate with Python
If you want to generate the PDF automatically using Python, add this to your script:
1
2
3
4
5
6
7
8
9
| import subprocess
latex_file = "api_documentation.tex"
# Compile the LaTeX document into a PDF
subprocess.run(["pdflatex", latex_file], check=True)
subprocess.run(["pdflatex", latex_file], check=True) # Second pass for proper references
print("✅ PDF generated successfully!")
|
Now, every time you update swagger.json, the script regenerates the PDF automatically. 🚀
How to Automate PDF API Documentation Generation with Jenkins
🔧 Step 1: Install Dependencies on Jenkins Server
1️⃣ Install Required Packages
Jenkins needs:
- Git (to pull changes)
- Python (to process Swagger JSON)
- LaTeX (pdflatex) (to generate PDFs)
For Linux (Ubuntu/Debian)
1
2
3
| sudo apt update
sudo apt install git python3 python3-pip texlive texlive-latex-extra -y
pip install jinja2
|
For macOS
1
2
| brew install texlive python
pip3 install jinja2
|
For Windows
- Install MiKTeX from miktex.org.
- Install Python from python.org.
- Run:
📜 Step 2: Add PDF Generation Script to Jenkins
Place this Python script in your documentation repository (generate_pdf.py).
 1
 2
 3
 4
 5
 6
 7
 8
 9
10
11
12
13
14
15
16
17
18
19
20
21
22
23
24
25
26
27
28
29
30
31
32
33
34
35
36
37
38
| import json
import os
import subprocess
from jinja2 import Template
# File paths
SWAGGER_JSON_FILE = "swagger.json"
LATEX_TEMPLATE_FILE = "swagger_template.tex"
GENERATED_LATEX_FILE = "api_documentation.tex"
OUTPUT_PDF = "api_documentation.pdf"
# Load Swagger JSON
with open(SWAGGER_JSON_FILE, "r") as f:
swagger_data = json.load(f)
# Load LaTeX template
with open(LATEX_TEMPLATE_FILE, "r") as f:
template_content = f.read()
# Create Jinja2 template
template = Template(template_content)
# Render LaTeX file with OpenAPI data
rendered_latex = template.render(paths=swagger_data.get("paths", {}))
# Write LaTeX content to file
with open(GENERATED_LATEX_FILE, "w") as f:
f.write(rendered_latex)
print(f"✅ LaTeX file '{GENERATED_LATEX_FILE}' generated successfully.")
# Compile LaTeX to PDF
try:
subprocess.run(["pdflatex", GENERATED_LATEX_FILE], check=True)
subprocess.run(["pdflatex", GENERATED_LATEX_FILE], check=True) # Second pass for proper references
print(f"✅ PDF '{OUTPUT_PDF}' generated successfully.")
except subprocess.CalledProcessError:
print("❌ Error compiling LaTeX to PDF.")
|
🔄 Step 3: Set Up Jenkins Pipeline to Generate PDF
1️⃣ Create a New Jenkins Job
- Open Jenkins Dashboard → New Item
- Select Freestyle Project
- Name it Generate-API-Docs-PDF
- Under Source Code Management, select Git and add your documentation repo URL.
- Under Build Triggers, enable Poll SCM and set a schedule:(Runs every 10 minutes if there’s a change)
2️⃣ Add Build Steps
Under Build Steps, click “Add build step” → “Execute Shell” and enter:
 1
 2
 3
 4
 5
 6
 7
 8
 9
10
11
12
13
14
15
16
17
18
19
20
| #!/bin/bash
DOCS_REPO="/var/lib/jenkins/workspace/Generate-API-Docs-PDF"
# Navigate to repo
cd "$DOCS_REPO"
# Pull latest changes
git pull origin main
# Run the Python script to generate the PDF
python3 generate_pdf.py
# Check if PDF was generated
if [ -f "api_documentation.pdf" ]; then
echo "✅ PDF successfully generated."
else
echo "❌ PDF generation failed!" >&2
exit 1
fi
|
📩 Step 4: Automatically Upload the PDF
Once the PDF is generated, we can:
✅ Archive it in Jenkins
✅ Push it to another repository
✅ Email it to the documentation team
1️⃣ Archive PDF in Jenkins
Under Post-Build Actions, click “Archive the artifacts” and enter:
Now, Jenkins will store the PDF, and it can be downloaded anytime.
2️⃣ Push PDF to Another Repo
To store the PDF in a central documentation repository, add this to the Build Steps:
 1
 2
 3
 4
 5
 6
 7
 8
 9
10
11
12
13
14
15
16
17
18
19
20
| #!/bin/bash
DOCS_REPO="/var/lib/jenkins/workspace/Generate-API-Docs-PDF"
PDF_STORAGE_REPO="/var/lib/jenkins/workspace/API-PDF-Storage"
# Clone storage repo if it doesn’t exist
if [ ! -d "$PDF_STORAGE_REPO" ]; then
git clone git@github.com:your-org/api-pdf-repo.git "$PDF_STORAGE_REPO"
fi
# Copy PDF to storage repo
cp "$DOCS_REPO/api_documentation.pdf" "$PDF_STORAGE_REPO/"
# Commit and push
cd "$PDF_STORAGE_REPO"
git add api_documentation.pdf
git commit -m "Updated API PDF - $(date)"
git push origin main
echo "✅ PDF pushed to storage repository."
|
3️⃣ Send the PDF via Email
- Install Jenkins Mailer Plugin (Manage Jenkins → Plugins → Install “Mailer”)
- Under Post-Build Actions, click “E-mail Notification”
- Enter recipients:
- In Advanced Settings, check:
✅ Attach PDF (api_documentation.pdf)
Now, Jenkins will email the latest PDF whenever it’s generated. 📩
🚨 Step 5: Fail Build if PDF Generation Fails
To prevent outdated PDFs, fail the build if PDF generation breaks.
Modify the Build Steps script:
1
2
3
4
| if [ ! -f "api_documentation.pdf" ]; then
echo "❌ PDF generation failed!" >&2
exit 1
fi
|
If the PDF isn’t generated, Jenkins fails the build and alerts the team. 🚨